Advanced AI: ComfyUI
OpenShot can connect to a local ComfyUI server and run AI workflows from the Project Files and Timeline context menus. This page explains what these tools are, what hardware they require, and where the built-in workflow templates live.
Warning
AI features in OpenShot are experimental and require a high-end workstation.
These tools are not recommended for laptops, mid-range desktops, or budget systems.
You must run a local ComfyUI server.
You should expect model downloads, setup work, and workflow troubleshooting.
Minimum Recommended Hardware
Component |
Recommendation |
|---|---|
GPU |
NVIDIA 5070 12GB or better (16-24GB VRAM strongly preferred) |
CPU |
Ryzen 9 5900-class CPU (or equivalent high-clock multi-core) |
System memory |
64GB RAM or more |
Storage |
200GB free space for models, cache, and generated outputs |
Experience |
Comfortable with ComfyUI graphs, models, and node dependencies |
If your system is below these levels, jobs will stall, fail, and produce unstable results. If your GPU has 8GB or less of VRAM, you will run out of memory running these models.
Installation and Setup
Use this quick setup path before trying any AI workflow in OpenShot:
Install ComfyUI and confirm it starts correctly.
Install required custom nodes (listed below).
Download required model files (listed below) into matching model folders.
Start ComfyUI, then open Edit->Preferences->Advanced and set ComfyUI URL.
Click Check to confirm OpenShot can reach the server.
For a full step-by-step server setup guide, see the OpenShot wiki: ComfyUI: Advanced AI Setup Guide.
For full ComfyUI installation details, see the official repository: ComfyUI on GitHub.
Required Custom Nodes
Required Models / Files
ComfyUI/models/diffusion_models/wan2.1_vace_1.3B_fp16.safetensorsComfyUI/custom_nodes/ComfyUI-Frame-Interpolation/ckpts/rife/rife47.pthComfyUI/models/checkpoints/sd_xl_base_1.0.safetensorsComfyUI/models/checkpoints/sd_xl_refiner_1.0.safetensorsComfyUI/models/checkpoints/stable-audio-open-1.0.safetensorsComfyUI/models/clip_vision/clip_vision_g.safetensorsComfyUI/models/diffusion_models/wan2.2_ti2v_5B_fp16.safetensorsComfyUI/models/grounding-dino/groundingdino_swint_ogc.pthComfyUI/models/sam2/sam2.1_hiera_base_plus.ptComfyUI/models/sam2/sam2.1_hiera_small-fp16.safetensorsComfyUI/models/sam2/sam2.1_hiera_small.ptComfyUI/models/sam2/sam2.1_hiera_tiny-fp16.safetensorsComfyUI/models/sam2/sam2.1_hiera_tiny.ptComfyUI/models/sam2/sam2_hiera_small.ptComfyUI/models/stt/whisper/large-v3.ptComfyUI/models/stt/whisper/medium.ptComfyUI/models/text_encoders/t5-base.safetensorsComfyUI/models/text_encoders/umt5_xxl_fp8_e4m3fn_scaled.safetensorsComfyUI/models/TTS/Ace-Step1.5/acestep-v15-turbo/silence_latent.ptComfyUI/models/upscale_models/RealESRGAN_x4plus.safetensorsComfyUI/models/vae/wan_2.1_vae.safetensorsComfyUI/models/vae/wan2.2_vae.safetensorsComfyUI/models/VLM/transnetv2-pytorch-weights/transnetv2-pytorch-weights.pth
What Users See in OpenShot
When ComfyUI is available, OpenShot shows AI tools in context menus:
Create with AI for creating new assets
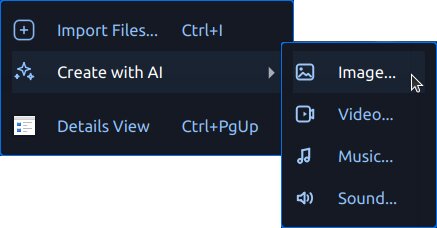
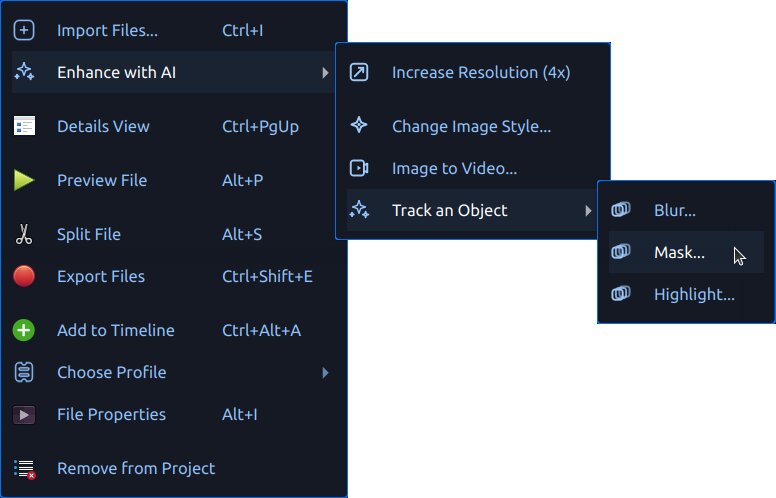
Enhance with AI (images) for processing image assets
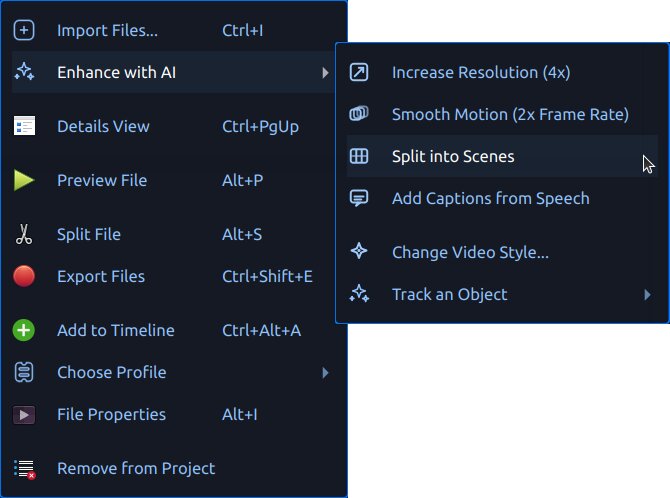
Enhance with AI (videos) for processing video assets
Generated files are added to Project Files with progress text and
queue badges. Outputs are saved under .openshot_qt/comfyui-output/.
Starting a new project or opening an existing project clears the
temporary .openshot_qt AI working folders so you begin with a clean slate.
Your saved projects are not affected, and any assets previously copied into a
PROJECTNAME_Assets folder remain in that project’s directory.
If ComfyUI is unavailable, OpenShot disables the AI menus. Configure the server URL in Edit->Preferences->Advanced, then use the Check button to test connectivity.
Workflow Templates
OpenShot reads built-in templates from comfyui/. It also loads custom
user templates from ~/.openshot_qt/comfyui/.
To add your own workflow:
In ComfyUI, open the workflow tab you want to use.
Choose Export (API) to save the workflow as a
*.jsonfile.Copy that JSON file into
~/.openshot_qt/comfyui/.Restart OpenShot, or reopen the project if needed.
OpenShot will automatically load the workflow and show it in the appropriate AI menu. When you trigger it from OpenShot, the selected source file is passed into the workflow, and the output from the workflow’s final output node is imported back into Project Files.
OpenShot also writes a .openshot_qt/comfyui/debug.json payload for advanced
users who want to inspect the exact request sent to ComfyUI.
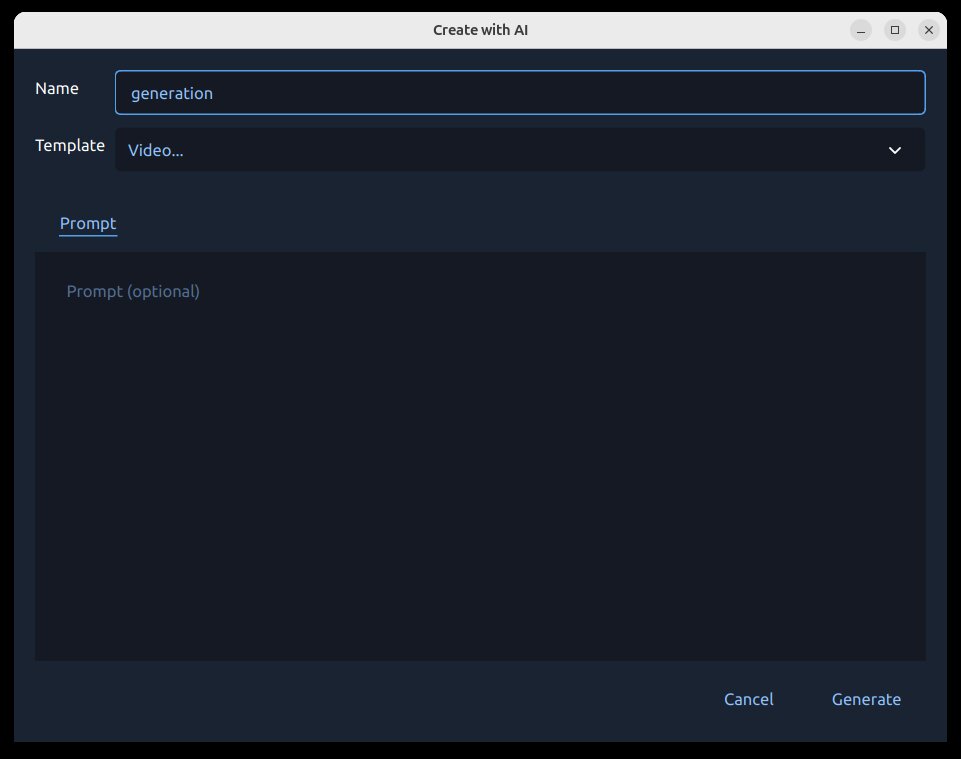
AI Action Dialog
Both Create with AI and Enhance with AI open the same generation dialog.
Why this dialog matters:
It keeps all AI inputs in one place.
It validates required fields before queuing the job.
It lets you set up tracking prompts before expensive runs.
What you can do in the dialog:
Choose the workflow/action.
Enter the prompt text.
Preview the selected source file (for enhance workflows).
Set the output name for generated media.
Pick a reference image in the Reference tab for workflows that require one.
Provide tracking points/rectangles for tracking workflows.
Start the job with Generate or close with Cancel.
Tracking (Mask, Blur, Highlight)
Tracking workflows (Blur…, Highlight…, Mask…) use a region screen where you mark what to include and what to ignore.
Why this matters
Tracking helps your effect stay attached to a moving subject over time. For example, you can blur a face, highlight a player, or generate a clean mask that follows the same object across many frames.
Tracking Icons
Icon / Marker |
Meaning |
|---|---|
Blue dot |
Positive tracking coordinate (foreground/subject seed point). |
Red dot |
Negative tracking coordinate (background/exclusion seed point). |
Blue rectangle |
Positive region seed (broad subject hint). |
Red rectangle |
Negative region seed (broad exclusion hint). |
Delete icon |
Clear all current tracking seeds (points/rectangles) and start over. |
How Tracking Works
OpenShot sends your positive and negative markers as seed coordinates to the tracking model, which builds a mask for the subject and then follows it over time. Better seeds usually produce cleaner masks and less drift. [sam2]
How to use it
Pick a frame where the subject is clearly visible.
Start with one blue dot on the subject.
Add red dots on nearby background only if needed.
Add rectangles when you need faster broad selection.
Repeat on additional frames when motion/shape changes.
Adjusting over time (frame slider):
Move the frame slider to different moments in the clip.
Add or adjust dots/rectangles on frames where tracking starts to drift.
Use additional seed points only where needed, especially on occlusions, fast motion, or major shape changes.
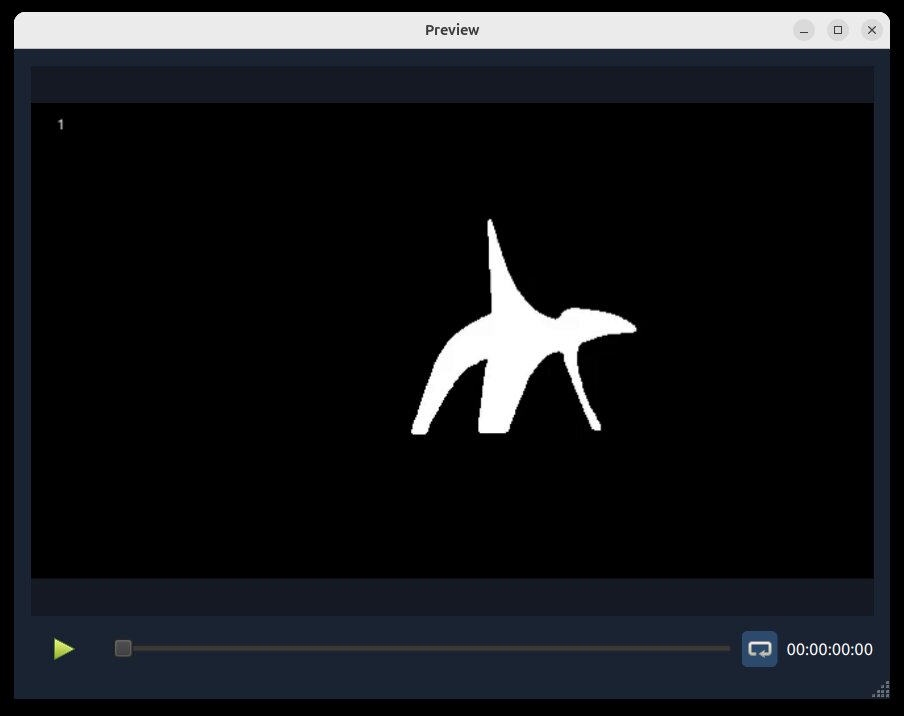
Mask Preview Output (from this tracking process):
Best Practices
Use a short test clip first.
Start simple: a single blue dot is often enough.
Add more points only where tracking fails.
If needed, add a more nuanced set of positive/negative points and rectangles.
Keep positive and negative points separated clearly.
If tracking becomes messy, use the Delete icon and restart with cleaner seeds.
SAM2 (Segment Anything Model 2) project: facebookresearch/sam2
Job Queue, Progress, and Cancel
After you click Generate, the request is queued and runs in OpenShot’s AI job queue.
Progress is shown in Project Files (badges and status text).
Completed outputs are imported back into Project Files.
Active jobs can be canceled by right-clicking the generated project file with the progress bar and choosing Cancel Job.
Outputs are written under
.openshot_qt/comfyui-output/.
Built-in JSON Workflows
The sections below map directly to built-in JSON templates in comfyui/.
Each subsection describes why you might use it, how to run it, and key details.
Create with AI
Image… (txt2img-basic)
Why: Generate still images from a text prompt.
How: Choose Create with AI -> Image…, enter a prompt, then generate.
Details: Uses
comfyui/txt2img-basic.jsonwithsd_xl_base_1.0.safetensors.
Video… (txt2video-svd)
Why: Generate short video clips from text.
How: Choose Create with AI -> Video…, enter a prompt, then generate.
Details: Uses
comfyui/txt2video-svd.jsonwith WAN video generation models.
Sound… (txt2audio-stable-open)
Why: Generate non-musical audio from text prompts.
How: Choose Create with AI -> Sound…, enter a prompt, then generate.
Details: Uses
comfyui/txt2audio-stable-open.jsonwith Stable Audio Open models.
Music… (txt2music-ace-step)
Why: Generate music from style/tags (and optional lyrics).
How: Choose Create with AI -> Music…, enter prompt text, then generate.
Details: Uses
comfyui/txt2music-ace-step.jsonwith an Ace-Step 1.5 checkpoint.
Enhance with AI
Change Image Style… (img2img-basic)
Why: Restyle an existing image while keeping the source composition.
How: Choose Enhance with AI on an image, enter a style prompt, then generate.
Details: Uses
comfyui/img2img-basic.jsonwithsd_xl_base_1.0.safetensors.
Depth (image-extract-depth)
Why: Export a grayscale depth-map image from a source image.
How: Choose Enhance with AI -> Extract -> Depth on an image, then generate.
Details: Uses
comfyui/image-extract-depth.jsonwithDepthAnythingV2Preprocessor.
Lines (image-extract-lines)
Why: Export a line-map image from a source image.
How: Choose Enhance with AI -> Extract -> Lines on an image, then generate.
Details: Uses
comfyui/image-extract-lines.jsonwithLineArtPreprocessor.
Image to Video… (img2video-wan)
Why: Turn a still image into a generated video shot.
How: Choose Enhance with AI on an image, provide prompt guidance, then generate.
Details: Uses
comfyui/img2video-wan.jsonwith WAN 2.2 image-to-video models.
Change Video Style… (video2video-basic)
Why: Apply a new visual style to a source video.
How: Choose Enhance with AI on a video, enter a style prompt, pick a reference image in the Reference tab, then generate.
Details: Uses
comfyui/video2video-basic.jsonwith WAN VACE video-to-video nodes, a required reference image, blendedDepthAnythingV2Preprocessordepth plus Canny edge control, and thewan2.1_vace_1.3B_fp16.safetensors,wan_2.1_vae.safetensors, andumt5_xxl_fp8_e4m3fn_scaled.safetensorsmodels.
Depth (video-extract-depth)
Why: Export a grayscale depth-map version of a source video.
How: Choose Enhance with AI -> Extract -> Depth on a video, then generate.
Details: Uses
comfyui/video-extract-depth.jsonwithDepthAnythingV2Preprocessorand preserves the source frame rate.
Lines (video-extract-lines)
Why: Export a line-map version of a source video.
How: Choose Enhance with AI -> Extract -> Lines on a video, then generate.
Details: Uses
comfyui/video-extract-lines.jsonwithLineArtPreprocessorand preserves the source frame rate.
Increase Resolution (image) (upscale-realesrgan-x4)
Why: Upscale low-resolution images.
How: Choose Enhance with AI on an image, select increase resolution, then generate.
Details: Uses
comfyui/upscale-realesrgan-x4.jsonwithRealESRGAN_x4plus.safetensors.
Increase Resolution (video) (video-upscale-gan)
Why: Upscale video frames for higher apparent detail.
How: Choose Enhance with AI on a video, select increase resolution, then generate.
Details: Uses
comfyui/video-upscale-gan.jsonwithRealESRGAN_x4plus.safetensors.
Smooth Motion (2x Frame Rate) (video-frame-interpolation-rife2x)
Why: Increase frame rate for smoother perceived motion.
How: Choose Enhance with AI on a video, select smooth motion, then generate.
Details: Uses
comfyui/video-frame-interpolation-rife2x.jsonwithrife47.pth.
Split into Scenes (video-segment-scenes-transnet)
Why: Automatically detect scene changes and split long clips into segments.
How: Choose Enhance with AI on a video, select scene splitting, then generate.
Details: Uses
comfyui/video-segment-scenes-transnet.jsonwith TransNetV2.
Add Captions from Speech (video-whisper-srt)
Why: Transcribe speech into subtitle/caption files.
How: Choose Enhance with AI on a video, select captions, then generate.
Details: Uses
comfyui/video-whisper-srt.jsonand creates SRT output.
Tracking Workflows (SAM2)
These workflows use the same region/tracking input flow and are grouped in the tracking context menu.
Blur… (image) (image-blur-anything-sam2)
Why: Blur selected subject areas in a still image.
How: Select points/rectangles for the subject, then generate.
Details: Uses
comfyui/image-blur-anything-sam2.jsonwith SAM2 image segmentation.
Highlight… (image) (image-highlight-anything-sam2)
Why: Emphasize selected subject areas in a still image.
How: Select points/rectangles for the subject, then generate.
Details: Uses
comfyui/image-highlight-anything-sam2.jsonwith SAM2 image segmentation.
Mask… (image) (image-mask-anything-sam2)
Why: Generate an image mask for selected subject areas.
How: Select points/rectangles for the subject, then generate.
Details: Uses
comfyui/image-mask-anything-sam2.jsonwith SAM2 image segmentation.
Blur… (video) (video-blur-anything-sam2)
Why: Track and blur a moving subject in video.
How: Mark subject/background in the region screen, then generate.
Details: Uses
comfyui/video-blur-anything-sam2.jsonwith SAM2 video tracking.
Highlight… (video) (video-highlight-anything-sam2)
Why: Track and highlight a moving subject in video.
How: Mark subject/background in the region screen, then generate.
Details: Uses
comfyui/video-highlight-anything-sam2.jsonwith SAM2 video tracking.
Mask… (video) (video-mask-anything-sam2)
Why: Generate an animated mask that follows a moving subject.
How: Mark subject/background in the region screen, then generate.
Details: Uses
comfyui/video-mask-anything-sam2.jsonwith SAM2 video tracking.
Starting Points for New Users
If you are new to these tools, start with:
Create with AI -> Image
Enhance with AI -> Increase Resolution
Enhance with AI -> Smooth Motion
Enhance with AI -> Split into Scenes
Enhance with AI -> Add Captions
Troubleshooting
If AI menus do not appear or jobs fail immediately:
Verify ComfyUI is running and reachable at the configured URL.
Confirm required models exist in your ComfyUI environment.
Confirm custom node packages are installed for the workflow you selected.
Reduce batch/chunk sizes for long clips.
Re-test with a short clip or still image first.
For general performance and cache tuning, see Preferences and Playback.